
INSTRUCTIONS using SD-card
SD means Secure Digital. Cassette tapes and Floppy Disk contained moving parts, which are inherently prone to wearing out over time and eventually needing recalibration or replacement. SD is a new type of storage that is “solid-state” and has no moving parts. It is “static” RAM that remembers its information even when the power is gone, allowing it to be transported from place to place in a much more secure fashion (as tapes and disk are prone to being damaged by heat, weather, dust, and eventual wear from usage). This type of memory was vital for the development of “instant-on” tablet computers. It is now possible to use these SD cards to “simulate” a full Disk Drive system on many vintage computers, but in a much more practical, reliable, and faster way than the original disk media.

DOWNLOAD (ZIP w/ text file instructions and all binaries)
Commodore PET Notes
- Obtain SD2PET adapter from here (there are other similar SD-card adapter options that will probably work similarly, but this is the one I have verified myself). This device uses the same IEEE-488 interfaces as the Commodore PET to emulate the original floppy disk drive system. Very cool!
- Copy DHUNTERPET.PRG to an SD card
- Insert that SD card into the SD2PET
- Attach SD2PET to your Commodore PET (and the corresponding power adapter into the cassette port)

- Power on the Commodore PET system
- OPTIONAL: To verify SD-adapter is working, enter command “DIRECTORY” <RETURN> and you should see a list of files on the SD-card. If not, then ensure that the adapter is attached securely and in the correct direction.
- (the SD2PET should light up RED, YELLOW, GREEN briefly on power-up; that LED light will then go to off, which is normal operation)
- Enter command (with double quotes): DLOAD “DHUNTERPET.PRG” <RETURN>
- Enter the command: RUN <RETURN>

Commodore 64 Notes
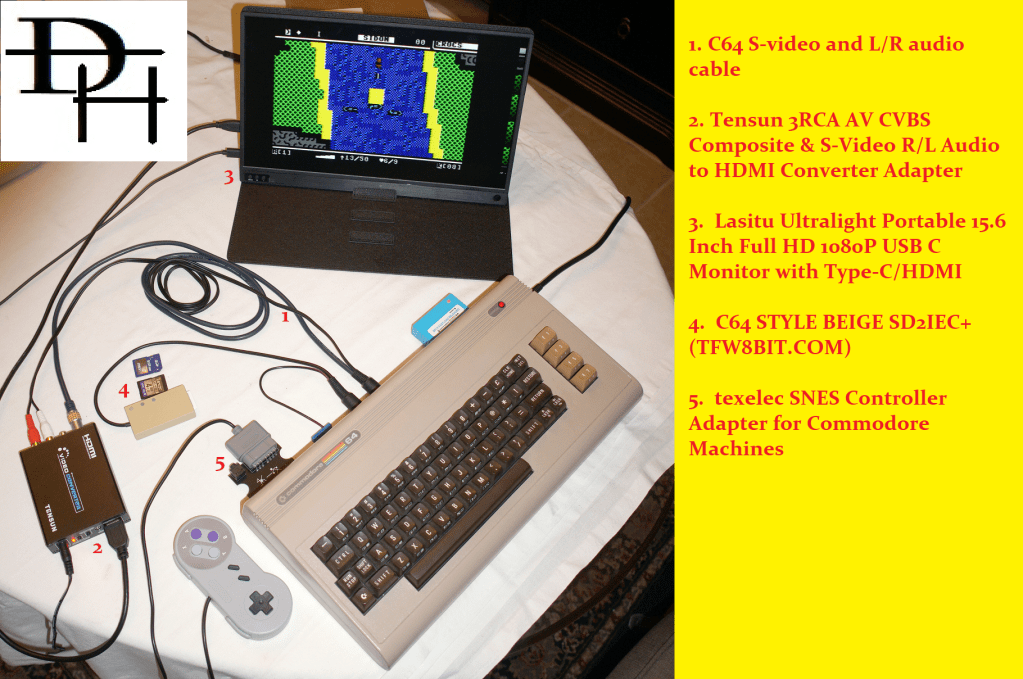
If you do not have a vintage television to connect your C64, you can use an S-video to HDMI adapter.
If you do not have a C64 disk drive or cassette player, you can load media on the C64 using a modern SD-card adapter. The one I used is SD2IEC+ and is different than the one used on the PET. Note, the PET Datasette is compatible with the C64, but you would need to load the C64 PRG saved on a tape (not the PET PRG).
For the SD2IEC+, it can be ordered with an SD-card that can be used to switch directories and load PRGs. I used the C64 “499” folder on the SD-card. After powering on the C64, then use this command:
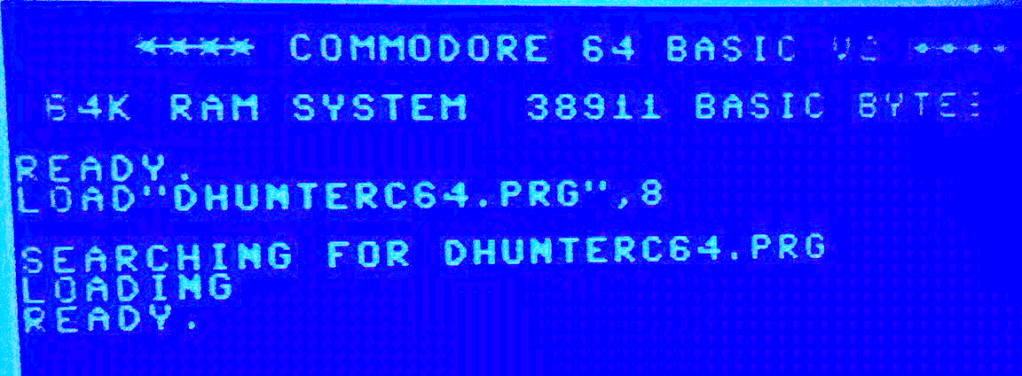
LOAD “*”,8
The above command loads the first PRG it finds on the inserted media of device 8 (which is typically the “first” disk drive). Then, issue the command:
RUN
And a menu appears. Navigate (cursor up/down, use SHIFT-cursor to move up) to the folder containing your copy of DHUNTER64.PRG (you can also swap SD-cards after the menu program has been loaded; press RETURN on the left-arrow in the menu to refresh the contents presented in that menu).
NOTE: The blue “cartridge” on the C64 in the image above is a TFW8BIT “fast loader” that helps load content from the SD-card at a faster speed. It is not essential, but it does help loads programs much faster. Without, loading files off disk (even emulated) can take over a minute!
If you don’t have the standard SD2IEC+ SD-card (or maybe are working with a physical floppy disk drive), the commands to load:
LOAD “$”,8 loads the directory in BASIC
LIST
LOAD “file.PRG”,8 the ,8 refers to the disk drive (,1 is floppy)
RUN
Reminder on how to open D64 files (e.g. PETSCII Robots):
OPEN 15,8,15,”C64ROBOTS.D64″
CLOSE 15
LOAD “$”,8 (optional, just to inspect and make sure right disk is loaded)
LIST
LOAD “C64ROBOTS.PRG”,8
RUN
